A siding job can look simple from the street. Then you get close and see the details that decide whether the exterior holds up through Ohio wind, rain, freeze-thaw cycles, and summer heat. This vinyl siding installation process guide explains what actually happens during a professional install, what should be checked at each stage, and where shortcuts tend to cause trouble later.
For homeowners, that matters because vinyl siding is not just a cosmetic layer. It is part of a system that manages water, allows for movement during temperature swings, and protects the wall assembly underneath. When each part is installed in the right order, the home looks better and performs better. When one step is rushed, problems can show up as loose panels, moisture intrusion, uneven lines, or trim that separates after a season or two.
What a proper vinyl siding installation process guide should cover
A good installation process starts well before the first panel goes on the wall. The crew should be evaluating the existing exterior, measuring carefully, checking for damage beneath old siding, and planning around penetrations like windows, doors, vents, and utility lines. On homes in places like Lima and Findlay, weather exposure also affects the approach. A house that takes strong western sun or repeated storm exposure may need more attention to fastening, flashing, and insulation details.
The best installs are orderly. That sounds basic, but sequence matters. Vinyl siding is designed to shed water, not trap it, so trim pieces, starter strips, house wrap, flashing, and panels all need to overlap correctly.
Step 1: Inspection, measurements, and wall prep
The first stage is assessment. If old siding is being removed, the wall sheathing underneath has to be checked for rot, soft spots, mold risk, and structural issues around windows and doors. This is one of the biggest differences between a surface-level job and a professional one. New siding can hide underlying damage for a while, but it does not fix it.
Measurements are more than square footage. Installers should account for gables, soffits, corners, trim transitions, and waste factors. Layout planning matters too, especially on front elevations where uneven panel termination can be obvious from the curb.
Prep also includes making the wall flat enough for siding to hang correctly. Vinyl does not hide major irregularities well. If the substrate is wavy, the finished wall can end up looking buckled even when the panels themselves are intact.
Step 2: Weather barrier and flashing details
Before siding goes up, the wall needs proper water management. That usually means a weather-resistant barrier installed over the sheathing, along with flashing tape or metal flashing at vulnerable openings. Windows, doors, and penetrations are common failure points. If those details are not handled correctly, water can get behind the siding and stay there.
This is where climate knowledge matters. In Northwest and West Central Ohio, wind-driven rain and winter moisture can test every seam. The siding itself is not the primary waterproof layer. It is part of the defense, but the barrier behind it does the heavy lifting when water gets past the exterior surface.
Some homes may also get added insulation or a leveling layer at this point. That can improve energy performance and create a cleaner finished plane. The trade-off is that trim depth and fastening details need to be adjusted so everything still sits correctly.
Step 3: Starter strip and layout lines
The starter strip sets the tone for the entire installation. If it is not level, the siding courses above it will continue that error across the whole wall. Installers snap level lines, establish reference points, and set the base course carefully.
This step tends to be overlooked by homeowners because it does not look dramatic, but it is one of the most important parts of the job. A level start is what keeps reveals consistent under windows, across garage walls, and around entryways.
Layout planning also helps avoid awkward narrow pieces at the top of walls or around prominent features. Sometimes adjustments are made early so the finished appearance is balanced rather than pieced together.
Step 4: Trim installation before field panels
A lot of the system is built around trim. Corner posts, J-channels, utility trim, undersill trim, and other accessory pieces are usually installed before the main siding panels. These components receive panel ends, allow expansion, and create finished transitions at openings and rooflines.
In a true vinyl siding installation process guide, this is the point where details separate durable work from average work. Trim must be aligned, properly fastened, and cut with enough clearance for movement. Vinyl expands and contracts with temperature changes. In Ohio, where seasonal swings are real, that movement cannot be ignored.
When trim is installed too tight, panels may warp or pop. When it is too loose or poorly aligned, the finished exterior can rattle in wind or look uneven around windows.
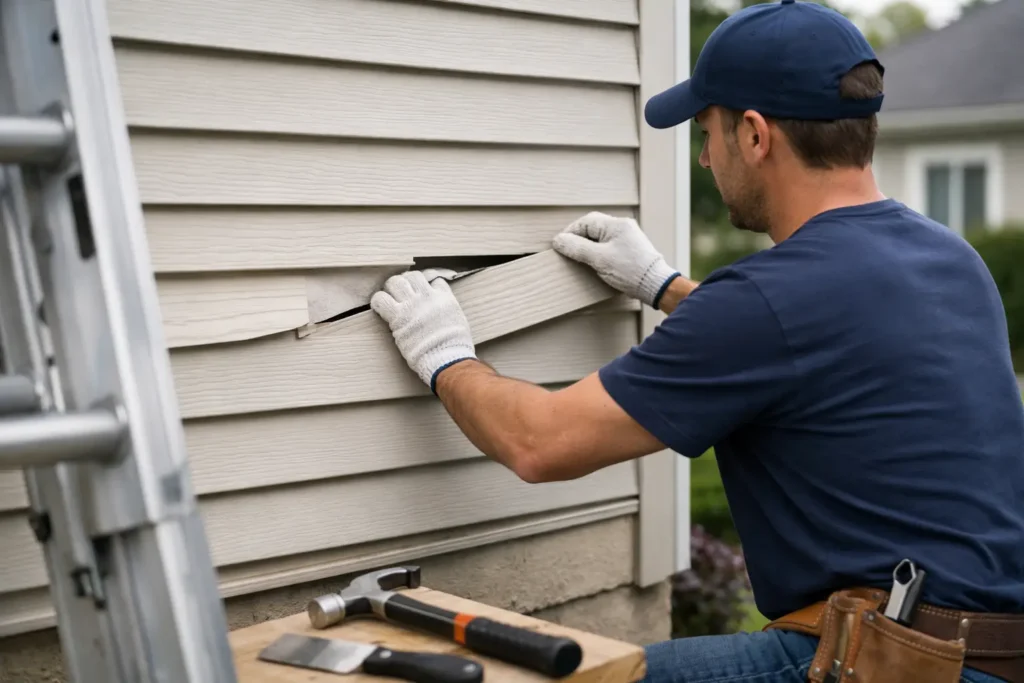
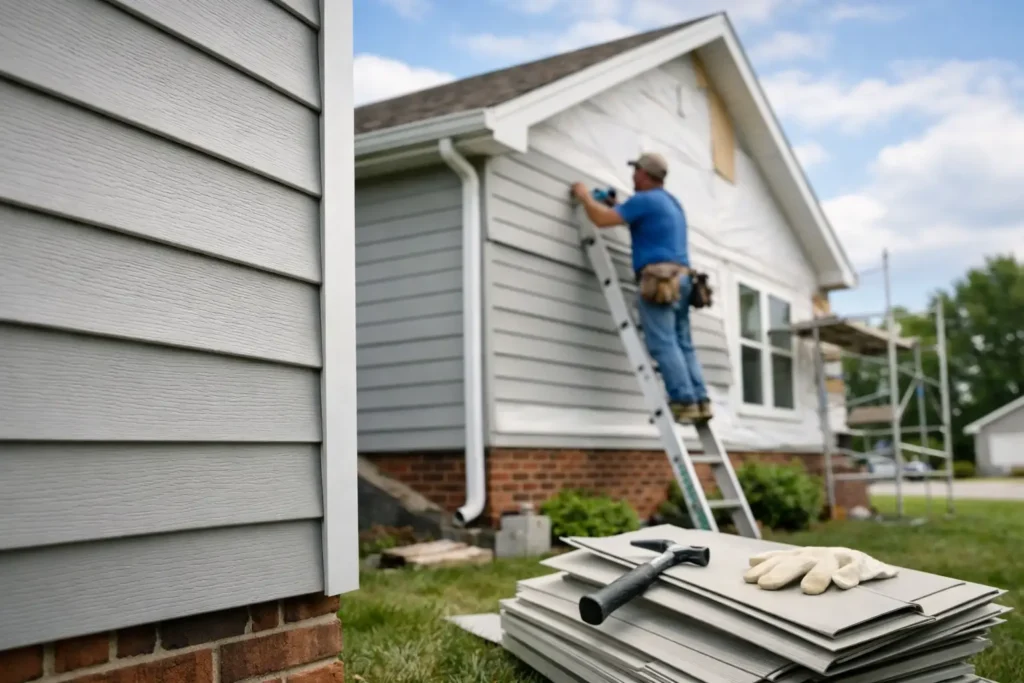
Step 5: Hanging the vinyl siding panels correctly
Once the wall is prepped and trim is in place, the field panels go on course by course. Panels lock into the starter strip and into one another as the wall builds upward. The key here is controlled fastening. Nails should be centered in the nailing slots and not driven tight against the panel.
That small gap is intentional. Vinyl needs room to move. A common installation mistake is overdriving nails, which can pin the panel in place and lead to rippling or buckling as temperatures change. Another problem is stretching the panel during installation. It may look straight at first, but stretched panels can pull back later and create visible gaps.
Courses should remain level and fully engaged. Installers also need to stagger seams thoughtfully so the pattern looks clean rather than repetitive. On longer walls, seam placement can have a big visual impact.
Step 6: Working around windows, doors, and penetrations
Most siding complications happen at interruptions in the wall. Windows, doors, dryer vents, exterior lights, hose bibs, and electrical service entries all require careful cutting and finishing. These areas need to look clean, but they also need to direct water out and away.
Panels are cut to fit into the surrounding trim, with appropriate clearance for expansion. At the top of openings, flashing and channel details matter most. If that area is mishandled, water can work behind the siding and into the wall.
This is also where color match and profile match become especially noticeable on partial replacement jobs. If one section is being repaired or tied into an existing elevation, the transition should not stand out more than necessary.
Step 7: Finishing the top course, soffit, and fascia transitions
The top of the wall often requires custom cutting because the last course rarely lands at full height. That panel usually needs to be trimmed and secured into undersill or finish trim. If it is not locked in properly, wind can catch it.
Where walls meet eaves, soffit and fascia details come into play. These transitions should look tight and finished while still allowing ventilation where needed. Homes with older rooflines or previous exterior work sometimes need extra adjustment here, since the edges are not always perfectly square.
This step can expose whether the earlier layout was planned well. A balanced top course generally reflects a crew that thought ahead instead of improvising late in the job.
Common problems a homeowner should watch for
Even if you are not installing siding yourself, it helps to know what quality looks like. Panels should lie flat without appearing strained. Lines should look straight across the wall. Trim should fit cleanly around openings, and corners should not look twisted or loose.
A few warning signs are worth noting. Wavy walls may point to poor wall prep or overfastening. Gaps at trim can suggest bad cutting or movement issues. Loose sections can mean improper locking or fastening. If the siding seems overly tight, especially in hot or cold weather, that can shorten its lifespan.
There is also a judgment call between speed and care. Efficient crews are not the problem. Rushed detail work is. The homes that hold up best through repeated Ohio winters are usually the ones where prep, flashing, and fastening were treated as performance issues, not just steps on a checklist.
Why the installation process matters as much as the material
Vinyl siding has a reputation for being low maintenance, and that is true when it is installed correctly. But the product can only perform as well as the system behind it. Good panels on a poorly prepared wall will still disappoint. Average-looking homes can also gain a lot from a careful install because clean lines, proper trim work, and solid weather detailing noticeably improve curb appeal.
For homeowners in older neighborhoods or newer subdivisions alike, the right process protects more than the siding itself. It helps defend the sheathing, insulation layer, and framing from moisture-related problems that are much harder to correct later.
Ohio Vinyl Siding Guru sees this firsthand on homes where small installation mistakes from prior work turned into bigger exterior issues over time. That is why the process matters. Not because it sounds technical, but because every step affects how the house looks after the crew leaves and how it performs years later.
If you are comparing siding work or trying to understand what should happen on your home, focus on sequence, wall prep, water management, and fastening technique. The finished color and style matter, but the real value is in the parts most people never notice once the job is done.